Districts can manage various settings for the Personalized Learner Profile app using the PLP App Settings page. The App Settings page can be accessed on the main PLP page in the gear dropdown in the top right corner of the screen. The ECRISS Admin role has this setting turned on by default. Contact your ECRA consultant to adjust roles that have access to the PLP App Settings page.
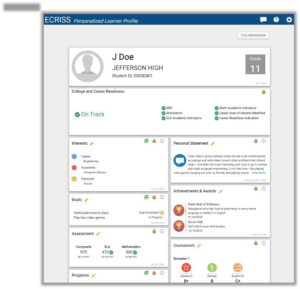
The App Settings page shows a sample view of tiles that are currently turned on for your district. The PLP App Settings page allows users to:
Reorder tiles
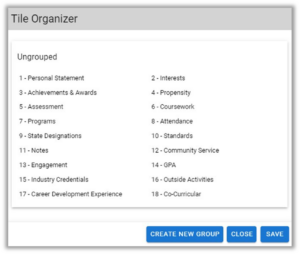
Reorder tiles using the button in the top right corner of the App Settings page
Upload student pictures
Upload pictures for student profiles using the student silhouette button in the header tile.
Edit tile names
Rename tiles using the pencil button.
Edit tile category dropdowns
Manage tile category dropdown options for select tiles* using the green plus button.
* Co-Curricular/Extracurricular tile, Interests tile, Outside Activities tile, and Programs/Interventions tile
Edit tile permissions
Control which roles can view and edit each tile using the padlock button.
Edit tile information legends
Add information legends for each tile using the gray information button.
Reorder tiles
The order of the tiles on the App Settings page is the same order that the tiles currently show on all student profiles. You can reorder the tiles using the Tile Organizer button at the top right corner of the App Settings page. the page. Simply drag-and-drop the tiles to reorder them.
If desired, you can further organize the tiles by grouping them under customizable headers. To add a tile group, click Create New Group. Add a tile group name and drag-and-drop desired tiles below the new header. To remove a tile group, simply move all of the tiles out of the group so that the group is empty. After you save and close the tile organizer window, all empty groups will automatically be deleted.
Any reorganization of tiles or addition of tile groups will apply to all student profiles in the district.
Upload student pictures
The upload button in the header tile can be used to upload student pictures. Select the student picture files from your computer. Each file should be an image file, such as a JPEG, and the file name of each image should be that student’s numeric student ID.
Edit tile names
The pencil button on each tile can be used to customize a tile’s name. When you update the name of a tile, it changes the name of that tile for all student profiles in your district. Click the Save icon when you are done updating the tile name.
Edit tile category dropdowns
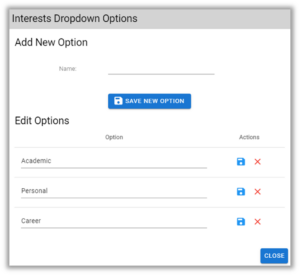
Select tiles* have dropdown options available for students to choose from when students are editing the tile on student profile pages. On the PLP App Settings page, the plus (+) button on these tiles can be used to manage a tile’s category dropdown options available to students.
The existing dropdown options are listed and can be edited or deleted. New dropdown options can also be added.
* Co-Curricular / Extracurricular tile, Interests tile, Outside Activities tile, and Programs / Interventions tile
Edit tile permissions
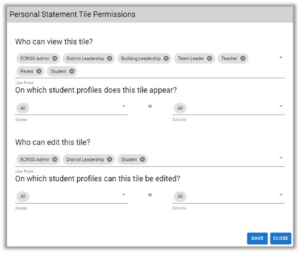
The “padlock” button on each tile can be used to set tile permissions. You can customize which user roles have permission to view the tile, and on which student profiles the tile should appear. You can also customize which user roles have permission to edit the tile and on which student profiles the tile can be edited.
In this example, the ECRISS Admin, District Leadership, Building Leadership, Teacher, Parent, and Student roles have permission to view the Personal Statement tile, but only the ECRISS Admin, District Leadership, and Student roles have permission to edit the tile.
You can limit on which student profiles the tile appears and/or can be edited by using the Grades dropdowns and/or the Schools dropdowns. All grades and schools are selected in the dropdowns, so the Personal Statement tile appears and can be edited on all student profiles. For example, below the On which student profiles does this tile appear? header, if Grades 7 and 8 are selected from the Grades dropdown and School B is selected from the Schools dropdown, the tile will only show on profiles for 7th and 8th grade students in School B.
Edit tile information legends
The information (i) button on each tile allows you to enter custom information for a tile. You can enter custom information for the system, which will show in that tile’s information button for all students in the district. If you would like different text in the information button for students in a specific building, select that building from the dropdown and enter the information you would like to display for students in that building. Any information entered for a building will override the information set for the system. For buildings with no information entered, the system information will show by default.
You can format any information text using the formatting buttons in the toolbar. You can also add hyperlinks, tables, and images.


