CREATING A PATHWAY:
Click on “Pathway Builder.”
Once you have the desired Indicators set up, scroll to the top of the Success Indicator Builder page and click “Pathway Builder.” From there, you can group indicators into pathways.
Create a new Pathway.
In the pathway builder, click on “Create a New Pathway.”
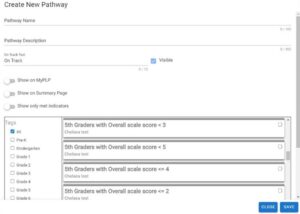
Complete fields and select Indicators.
Enter a name and description for your pathway and select which indicators you wish to include in your pathway. The tags on the left allow you to filter the available indicators by grade level. Select which indicators to add to the pathway and then save.
You can also adjust the permissions to who can see pathways. The Show on MyPLP toggle controls whether or not the pathway will display on student profile pages. The Show on Summary Page toggle controls whether or not the pathway will display on the Pathways page. The last toggle allows you to display only the indicators within a pathway that the student has met, and suppress the remaining indicators not met.
Activate the Pathway
Once you have set up a pathway, it needs to be activated before you can apply the pathway to a school year. To make the pathway active, click the ellipses on the right side of the pathway tile and select “Edit” from the resulting dropdown. In the bottom left corner of the window, a toggle shows that the pathway is created, but not active. Clicking the toggle makes the pathway active.


