ACCESSING INDICATORS:
- Log in to https://ecriss.ecragroup.com to view your Personalized Learner Profile App.
2. From any PLP page, click the gear icon on the top right corner and click on “App Settings.”
3. On the App Settings page, click on “Success Indicator Builder.”
CREATING AN INDICATOR:
- Create an Indicator – Choose the grade you wish to create an indicator for and select “Create New Indicator.”
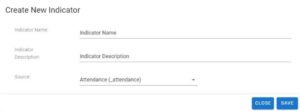
- Complete the fields in the “Create New Indicator” form.”You will need to populate fields for name, description, and source. The source determines the data file you wish to reference for the indicator and CANNOT be changed once an Indicator is created. All fields must be completed before clicking “Save.”

- Set criteria for new Indicator.
Click on the “Criteria” button to the right of the indicator and then click the “Add New Criteria” button in the bottom right corner to add a row. An Edit button now appears below each column header. The column headers available are determined by the PLP tile selected as the source for the indicator. Use the Edit buttons to set rules for the indicator. Rules can be set for other columns as well.
Repeat these steps for each new indicator.


